|
|
| (6 intermediate revisions by 2 users not shown) |
| Line 1: |
Line 1: |
| <blockquote style="font-size:14pt">
| | {{Migrated}} |
| ''Delimited Extract'' is one of the '''''Extract Method''''' options for '''Data Table''' objects in a '''Data Model'''. This method extracts tabular data from a delimiter-separated text file, such as a CSV file.
| | {{2023:{{PAGENAME}}}} |
| </blockquote>
| |
| | |
| This is the fastest, simplest and most effective method of extracting data from character delimited files, such as comma delimited CSV files or TXT files delimited by commas or other characters.
| |
| | |
| {|cellpadding="10" cellspacing="5" | |
| |-style="background-color:#36b0a7; color:white"
| |
| |style="font-size:14pt"|'''FYI'''
| |
| |
| |
| ''Delimited Extract'' is new to version '''2021'''. In older versions, this functionality was achieved with the ''CSV Extract'' table extraction method. ''Delimited Extract'' expands the ''CSV Extract'' functionality to extract tabular data from TXT files using delimiter characters besides a comma, such as semicolons or pipe characters.
| |
| |}
| |
| | |
| == About ==
| |
| | |
| {|cellpadding="10" cellspacing="5" | |
| |-
| |
| |style="font-size:14pt; color:#f89420; border: 2px solid #f89420; width:40px"|[[File:Asset 22@4x.png]]
| |
| |style="border: 2px solid #f89420"|
| |
| You may download and import the file below into your own Grooper environment (version 2021). This contains a '''Batch''' with the example document(s) discussed in this article and a '''Content Model''' configured according to its instructions.
| |
| * [[Media:Delimited Extract (v2021).zip]]
| |
| |}
| |
| | |
| | |
| A delimited text file is, effectively, a table of information saved to a simple text format. Rows in the table are easy to represent in a text file. Each row is a new line in the file. Columns are little trickier. They are marked by a "delimiter" character. This character is used to define where the table columns are in the text file.
| |
| | |
| For example, CSV (comma-separated values) files use a comma (<code>,</code>) as a delimiter. When opened in a spreadsheet program, such as Microsoft Excel or Google Sheets, these files look like standard spreadsheets. So, a CSV file with a table with some generic information collected for individuals might look something like the table below.
| |
| | |
| {|class="wikitable" style="margin:auto"
| |
| |First Name||Last Name||Email||SSN||Favorite Animal
| |
| |-
| |
| |Aaron||Aaronson||aaron@example.com||987-65-4321||aardvark
| |
| |-
| |
| |Billy||Billiams|| ||999-88-7777||billy goat
| |
| |-
| |
| |Cathy||Catherton||cat@example.com||900-00-1234||dog
| |
| |}
| |
| | |
| But a delimited file is just text data. There are no lines dividing the rows and columns. Instead, the vertical line boundaries between each column would be replaced with the delimiter character (a <code>,</code> for CSV files) and each row would be a new line in the file. So, it would look like the text below.
| |
| | |
| <pre style="margin-left:50px; margin-right:50px">
| |
| First Name,Last Name,Email,SSN,Favorite Animal
| |
| Aaron,Aaronson,aaron@example.com,987-65-4321,aardvark
| |
| Billy,Billiams,,999-88-7777,billy goat
| |
| Cathy,Catherton,cat@example.com,900-00-1234,dog
| |
| </pre>
| |
| | |
| TXT files can also be formatted as delimiter-separated tables. They may use a comma (<code>,</code>) or a different separator such as a semicolon (<code>;</code>) or a "pipe" character (<code>|</code>). For example, a "pipe-delimited" TXT file version of the data above would look like the text below.
| |
| | |
| <pre style="margin-left:50px; margin-right:50px">
| |
| First Name|Last Name|Email|SSN|Favorite Animal
| |
| Aaron|Aaronson|aaron@example.com|987-65-4321|aardvark
| |
| Billy|Billiams||999-88-7777|billy goat
| |
| Cathy,Catherton|cat@example.com|900-00-1234|dog
| |
| </pre>
| |
| | |
| The only difference is one file is a CSV file, using a comma (<code>,</code>) to distinguish the columns and the other is a TXT file, using the pipe character (<code>|</code>).
| |
| | |
| | |
| {|cellpadding=10 cellspacing=5 | |
| |valign=top style="width:40%"|
| |
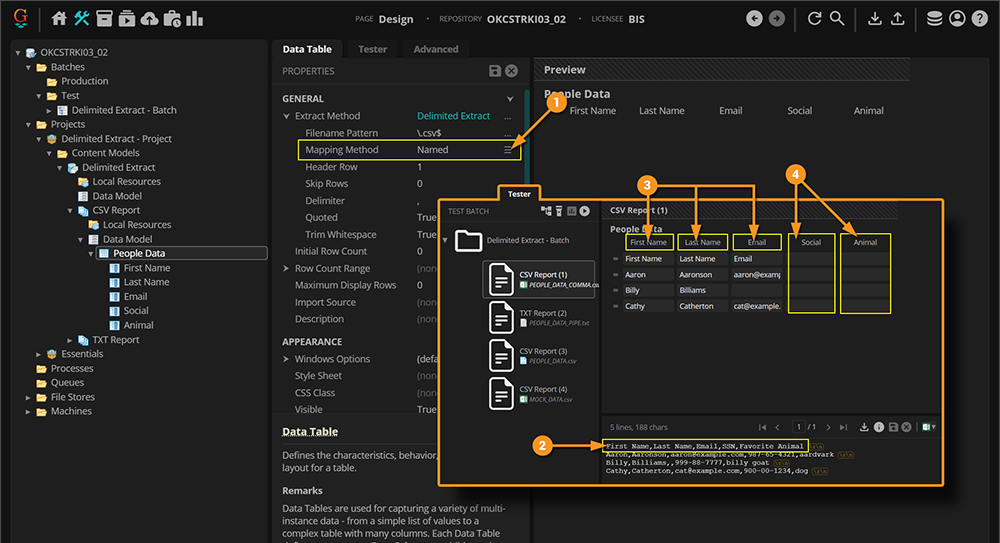
| The ''Delimited Extract'' table extraction method will parse these kinds of files and return their data to a '''Data Table''' object in a '''Data Model'''.
| |
| | |
| # For example, here we have a '''Data Table''' named "People Data" configured to extract tabular data from a CSV file.
| |
| # You can see the attached file to this '''Batch Folder''' is a CSV file named "PEOPLE_DATA_COMMA.csv".
| |
| # In the Document Viewer, we can see this is a simple CSV file with the data described above.
| |
| #* Each column ("First Name", "Last Name", "Email", "SSN", and "Favorite Animal") is separated by a single <code>,</code> character.
| |
| # The '''Data Table's''' '''''Extract Method''''' property is set to ''Delimited Extract''.
| |
| # The ''Delimited Extract'' sub-properties are configured according to the extracted file's type and delimited format.
| |
| #* These properties dictate what the imported document's filetype is (i.e. CSV or TXT), what delimiter character is used, how the data is mapped to the '''Data Table''' object's '''Data Columns'''.
| |
| #* These settings will be discussed in more depth, in the [[#How To|How To]] section of this article.
| |
| # Upon extraction, the '''Data Table''' returns the CSV file's data.
| |
| |
| |
| [[File:Delimited-extract-01.png]]
| |
| |}
| |
| | |
| {|cellpadding="10" cellspacing="5"
| |
| |-style="background-color:#f89420; color:white"
| |
| |style="font-size:22pt"|'''⚠'''
| |
| |
| |
| Currently, Grooper does not support "tabs" as a delimiter character. At the time of writing this article, the ''Delimited Extract'' method cannot extract data from a tab-delimited TXT file. Alternate '''''Extract Methods''''', such as the ''Row Match'' method, must be used instead.
| |
| |}
| |
| | |
| == How To ==
| |
| | |
| {|cellpadding="10" cellspacing="5" | |
| |-
| |
| |style="font-size:14pt; color:#f89420; border: 2px solid #f89420; width:40px"|[[File:Asset 22@4x.png]]
| |
| |style="border: 2px solid #f89420"|
| |
| You may download and import the file below into your own Grooper environment (version 2021). This contains a '''Batch''' with the example document(s) discussed in this article and a '''Content Model''' configured according to its instructions.
| |
| * [[Media:Delimited Extract (v2021).zip]]
| |
| |}
| |
| | |
| === Prereqs ===
| |
| | |
| {|cellpadding="10" cellspacing="5"
| |
| |-style="background-color:#f89420; color:white"
| |
| |style="font-size:22pt"|'''⚠'''
| |
| |
| |
| If you are testing ''Delimited Extract'' in '''Grooper Design Studio''' and are not returning ''any'' results or receiving an error message, read this first.
| |
| | |
| This will address the most common issues when testing the ''Delimited Extract'' method.
| |
| |}
| |
| | |
| There are three critical perquisites in order for the ''Delimited Extract'' method to work properly, whether testing its configuration in '''Grooper Design Studio''' or collecting the data during the '''Extract''' activity of a '''Batch Process'''.
| |
| # The '''Batch Folder''' must have an attached character-delimited file of a CSV or TXT format.
| |
| #* Excel files (XLSX) are capable of utilizing the ''Delimited Extract'' method. However, they must be converted to a CSV format first.
| |
| #* For more information on converting Excel files to CSV files, visit the [[Microsoft Office Integration]] article.
| |
| # If imported sparsely, the '''Batch Folder's''' attached CSV or TXT file must be loaded prior to extraction.
| |
| # The '''Batch Folder''' must be classified.
| |
| | |
| <tabs style="margin:20px">
| |
| <tab name="1. Attached File Considerations" style="margin:20px">
| |
| | |
| === 1. The Batch Folder must have an attached file of a CSV or TXT format. ===
| |
| | |
| {|cellpadding=10 cellspacing=5
| |
| |valign=top style="width:40%"|
| |
| When you import digital files into '''Grooper''' (ie PDFs, Word documents, Excel spreadsheets, TXT files, etc), they are stored as attachments on the created '''Batch Folder''' in the '''Batch'''. When inspecting a '''Batch''', the attached files are listed at the bottom of the '''Batch Folder''' icon.
| |
| | |
| # The documents here have CSV and a character-delimited TXT file attached to the '''Batch Folders'''. These documents are suitable for ''Delimited Extract''.
| |
| # Microsoft Excel files can ''also'' take advantage of ''Delimited Extract''. However, they must first be converted to the CSV file format.
| |
| # Excel files (XLSX) are not natively readable by '''Grooper'''. Without converting them to a CSV file (which is natively readable), you will see this message in the document viewer.
| |
| |
| |
| [[File:Delimited-extract-03.png]]
| |
| |-
| |
| |valign=top|
| |
| From '''Grooper Design Studio''' , you can convert a single XLSX file quickly and easily if you're trying to test out your '''Data Table's''' ''Delimited Extract'' configuration. You can perform the following steps from the Batch Viewer at any node in the Node Tree. If you can get to a Batch Viewer, and select a batch using the node's UI, you can do the following to convert an Excel file to CSV.
| |
| | |
| # Right-click the document folder with the attached Excel file.
| |
| # Select "Excel Document".
| |
| # Select "Excel to CSV..."
| |
| # This will bring up the following "Excel to CSV" configuration window.
| |
| # Using the '''''Conversion Method''''' property choose how you want to convert the file.
| |
| #* ''Convert'' will convert the attached Excel file, replacing it with a CSV file.
| |
| #* ''Burst'' will convert the file and save the results as one or more (in the case of Excel files with multiple sheets) children '''Batch Folders'''.
| |
| #* ''SaveNew'' will convert the file and save it as a new, additional file attached to the '''Batch Folder'''.
| |
| # Press the "Execute" button to convert the Excel file to a CSV file.
| |
| |
| |
| [[File:Delimited-extract-04.png]]
| |
| |-
| |
| |valign=top|
| |
| # Since we chose the ''Convert'' option, the attached file is converted, replacing the XLSX file with a CSV file.
| |
| # CSV files are natively readable by '''Grooper'''. Now we can view the file in the Document Viewer and '''Grooper''' can process the document.
| |
| # This is now an extractable file. Upon extraction, the '''Data Table''' (using the ''Delimited Extract'' method) returns the comma-separated values.
| |
| |
| |
| [[File:Delimited-extract-05.png]]
| |
| |}
| |
| | |
| {|cellpadding="10" cellspacing="5" | |
| |-style="background-color:#36b0a7; color:white"
| |
| |style="font-size:14pt"|'''FYI'''
| |
| |
| |
| This is a very "ad hoc" method of converting Excel files to CSV files. You can also perform this conversion using the '''Execute''' activity, selecting ''Excel Document'' as the '''''Object Type''''' and choosing ''Excel to CSV'' as the '''''Command'''''. You will use the '''Execute''' activity to automate converting Excel files in a '''Batch Process'''. For more information, visit the [[Microsoft Office Integration]] article.
| |
| |}
| |
| | |
| [[#Prereqs|Click to return to the top]]
| |
| </tab>
| |
| <tab name="2. Load the File" style="margin:20px">
| |
| === 2. If imported sparsely, the '''Batch Folder's''' attached CSV or TXT file must be loaded prior to extraction. ===
| |
| | |
| Digital files are imported into '''Grooper''' either "sparsely" or "fully".
| |
| * Fully imported files are fully loaded into the '''Grooper Repository'''. Their metadata properties (file name and extension, file dimensions, MIME type information, etc) are stored in the '''Grooper Database''' and their content (the full file itself) is copied to the '''Grooper File Store'''.
| |
| * Sparsely imported files are only partially loaded. Their metadata properties are stored in the '''Grooper Database''', but their content is ''not'' copied to the '''Grooper File Store'''. Instead the content is accessed with a link to the file's location (for example, if you import a file from your Windows hard drive, it would be its Windows folder location).
| |
| | |
| Typically, a sparsely imported document is described as a "usable" document in '''Grooper'''. You can classify it. You can extract data from it. You can apply '''Activities''' to it and it will behave as if it were fully loaded. Just instead of using a local copy in the '''Grooper File Store''' to process the document, '''Grooper''' travels the document link to access the file.
| |
| | |
| {|cellpadding=10 cellspacing=5 | |
| |valign=top style="width:40%"|
| |
| However, this is not the case for ''Delimited Extract''. The attached file ''must'' be loaded (copied into the '''Grooper File Store''') in order to extract any data.
| |
| | |
| # A sparsely imported file will be indicated by a gold chain link on the '''Batch Folder''' icon.
| |
| # If you attempt to extract the data using ''Delimited Extract'', nothing will return at this point.
| |
| |
| |
| [[File:Delimited-extract-06.png]]
| |
| |-
| |
| |valign=top|
| |
| From '''Grooper Design Studio''' , you can load file quickly and easily if you're trying to test out your '''Data Table's''' ''Delimited Extract'' configuration. You can perform the following steps from the Batch Viewer at any node in the Node Tree. If you can get to a Batch Viewer, and select a batch using the node's UI, you can do the following to load a '''Batch Folder's''' attached file (be it a CSV file, a TXT file, an XLSX file, a PDF file, or any other file).
| |
| | |
| # Right-click the document folder with the attached file.
| |
| # Select "File System Link".
| |
| # Select "Load Content..."
| |
| # This will bring up the following "Load Content" configuration window.
| |
| # Press the "Execute" button to load the file into the '''Grooper File Store'''.
| |
| |
| |
| [[File:Delimited-extract-07.png]]
| |
| |-
| |
| |valign=top|
| |
| # Upon loading the content, the chain link will change color from grey to silver.
| |
| #* The silver link indicates the content is loaded but '''Grooper''' retains a link to the file's location. This link can be used in the future if the content needs to be reloaded or otherwise accessed from its external location. Alternatively the link can be removed if no longer needed once the content is fully loaded into '''Grooper'''.
| |
| # With the content loaded, the data can now be extracted using ''Delimited Extract''.
| |
| |
| |
| [[File:Delimited-extract-08.png]]
| |
| |}
| |
| | |
| {|cellpadding="10" cellspacing="5"
| |
| |-style="background-color:#36b0a7; color:white"
| |
| |style="font-size:14pt"|'''FYI'''
| |
| |
| |
| This too is a very "ad hoc" method of loading files. You do the same thing using the '''Execute''' activity, selecting ''File System Link'' as the '''''Object Type''''' (or ''CMIS Document Link'', ''FTP Link'', ''Mail Link'' or one of the other ''Link'' options depending how the file was imported from what external storage platform) and choosing ''Load Content'' as the '''''Command'''''. You will use the '''Execute''' activity to automate foading files in a '''Batch Process'''.
| |
| |}
| |
| | |
| [[#Prereqs|Click to return to the top]]
| |
| </tab>
| |
| <tab name="3. Classify the Document Folder" style="margin:20px">
| |
| === 3. The '''Batch Folder''' must be classified. ===
| |
| | |
| When building a '''Batch Process''' you will always add an '''Extract''' activity ''after'' a '''Classify''' activity or some other operation classifies the '''Batch Folders''' in a '''Batch'''. This is because the '''Extract''' activity looks for the '''Content Type''' assigned to the document folder to access the '''Data Model''' configured to collect data from the document.
| |
| | |
| Typically, document folders do not need to be classified when performing unit testing in '''Grooper Design Studio'''. You can navigate to a '''Data Model''' or its child '''Data Elements''' in the Node Tree, select an unclassified '''Batch Folder''' object in a '''Batch''', press the "Test Extraction" button and a preview of the extracted data will be presented in the UI.
| |
| | |
| {|cellpadding=10 cellspacing=5
| |
| |valign=top style="width:40%"|
| |
| This is ''not'' the case when testing the ''Delimited Extract'' method! The '''Batch Folder''' ''must'' be classified (assigned a '''Document Type''') in order to test extraction.
| |
| | |
| # These documents are ''not'' classified. They do not have a '''Document Type''' assigned to them. They are generically listed as "Document".
| |
| # Upon testing the '''Data Table''' (using the ''Delimited Extract'' method), no data returns.
| |
| |
| |
| [[File:Delimited-extract-09.png]]
| |
| |-
| |
| |valign=top|
| |
| # These documents ''are'' classified. They have either the "CSV Report" or "TXT Report" '''Document Type''' (added to this '''Content Model''') assigned to them.
| |
| # As a classified document, upon testing the '''Data Table''' (using the ''Delimited Extract'' method), the table data ''is'' returned.
| |
| |
| |
| [[File:Delimited-extract-10.png]]
| |
| |}
| |
| | |
| [[#Prereqs|Click to return to the top]]
| |
| </tab>
| |
| </tabs>
| |
| | |
| === Delimited Extract Configuration ===
| |
| | |
| <tabs style="margin:20px">
| |
| <tab name="Enable Delimited Extract" style="margin:20px">
| |
| === Enable Delimited Extract ===
| |
| {|cellpadding=10 cellspacing=5
| |
| |valign=top style="width:40%"|
| |
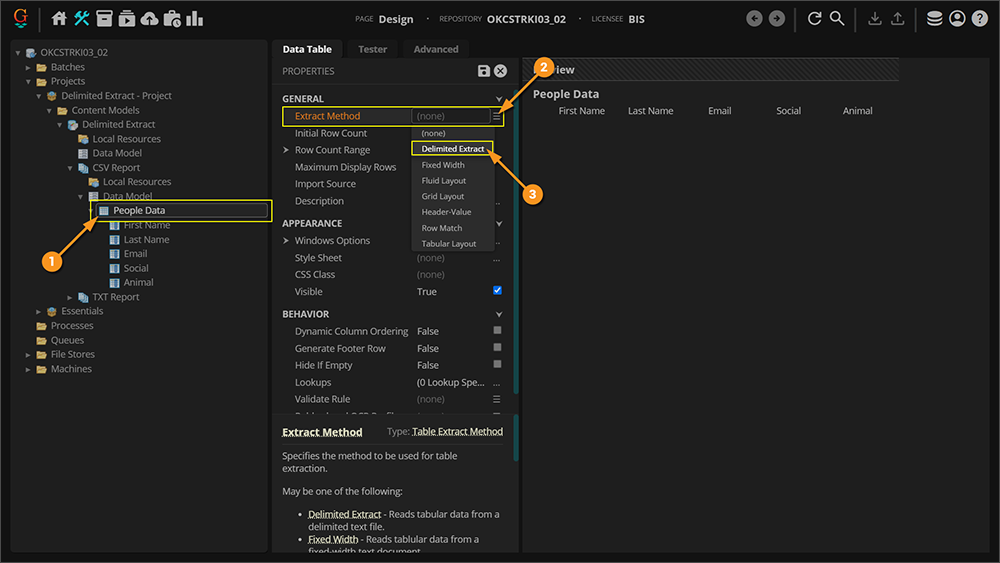
| To use ''Delimited Extract'' you will choose this as the '''''Extract Method''''' property of a '''Data Table'''
| |
| | |
| # Add or select a '''Data Table''' in the Node Tree.
| |
| #* We've selected the '''Data Table''' named "People Data". It is a '''Data Element''' of the "CSV Report" '''Document Type's''' '''Data Model'''.
| |
| # Select the '''''Extract Method''''' property.
| |
| # Choose ''Delimited Extract'' from the list of table extraction methods.
| |
| |valign=top|
| |
| [[File:Delimited-extract-11.png]]
| |
| |}
| |
| | |
| </tab>
| |
| <tab name="Choose the Mapping Method" style="margin:20px">
| |
| === Choose the Mapping Method ===
| |
| | |
| With ''Delimited Extract'' enabled, arguably the most important consideration is how you configure the '''''Mapping Method''''' property. This property determines how the "columns" in the delimiter-separated file correspond to the '''Data Columns''' in your '''Data Table'''. This can be one of three options:
| |
| # ''Named''
| |
| # ''Positional''
| |
| # ''Mapped''
| |
| | |
| === Named ===
| |
| | |
| The ''Named'' option will use column headers in the delimiter-separated file to map columns to the '''Data Columns''' in our '''Data Table'''. As long as the names match, '''Grooper''' will populate the '''Data Column''' with the data in the correspondingly named column in the CSV or TXT file.
| |
| {|cellpadding=10 cellspacing=5
| |
| |valign=top|
| |
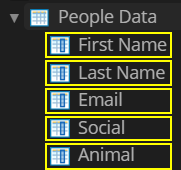
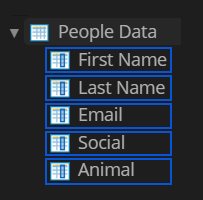
| For example, the '''Data Table''' in our example has five '''Data Columns'''.
| |
| * First Name
| |
| * Last Name
| |
| * Email
| |
| * Social
| |
| * Animal
| |
| |valign=top|
| |
| [[File:Delimited-extract-12.png]]
| |
| |-
| |
| |valign=top|
| |
| The CSV files in our batch also have five columns.
| |
| |valign=top|
| |
| [[File:Delimited-extract-13.png]]
| |
| |-
| |
| |valign=top|
| |
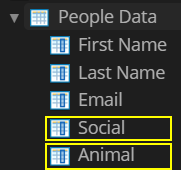
| However, some of the names are the same and some are different.
| |
| | |
| Only the "First Name", "Last Name" and "Email" columns match.
| |
| | |
| The "Social" and "Animal" '''Data Columns''' are labeled "SSN" and "Favorite Animal" in the CSV file.
| |
| |
| |
| [[File:Delimited-extract-14.png]]
| |
| [[File:Delimited-extract-15.png]]
| |
| |}
| |
| | |
| {|cellpadding=10 cellspacing=5
| |
| |valign=top style="width:40%"|
| |
| If we were to test extraction of this CSV file using the ''Named'' method, only ''part'' of the delimiter-separated values will be collected. Those in the columns whose names match will be returned, but the columns whose names ''do not'' will ''not''.
| |
| | |
| # The default '''''Mapping Method''''' option is ''Named''
| |
| # Upon extraction, '''Grooper''' will search the first row of the file for the column header labels.
| |
| #* The column headers ''must'' be present on the ''first'' row in order for this method to work.
| |
| # If a column header matches the name of one of the '''Data Table's''' child '''Data Columns''', that '''Data Column''' will return that column's data in the delimiter-separated file.
| |
| #* In our case, the names for the "First Name", "Last Name", and "Email" columns match. So that data is returned to the correspondingly named '''Data Column'''.
| |
| #* This is also order ''independent''. If "Email" was the first '''Data Column''' instead of the third, it would still return the data from the "Email" column on the document because their names still match.
| |
| # The "Social" and "Animal" '''Data Columns''' are blank because their names ''do not'' match.
| |
| | |
| If we changed the name of our '''Data Columns''' to match (both be named "SSN" and "Favorite Animal" respectively), we would get the full table populated.
| |
| | |
| However, let's completely ignore that and look at the next '''''Mapping Method''''' option, ''Positional''.
| |
| |
| |
| [[File:Delimited-extract-18.png]]
| |
| |}
| |
| | |
| {|cellpadding="10" cellspacing="5"
| |
| |-style="background-color:#36b0a7; color:white"
| |
| |style="font-size:14pt"|'''FYI'''
| |
| |
| |
| {|cellpadding=10 cellspacing=5
| |
| |valign=top style="width:40%"|
| |
| Before we do that, you probably noticed the first line of the table (the one with the column headers) is returned along with the actual table data. This is probably "junk data" you don't ultimately want collected at time of extraction.
| |
| | |
| # This is what the '''''Skip Rows''''' property is for.
| |
| # Set this to ''1'' and it will skip the first row in the file.
| |
| # This will remove that header row from our extracted results, extracting only the second and beyond.
| |
| |
| |
| [[File:Delimited-extract-19.png]]
| |
| |}
| |
| |}
| |
| | |
| === Positional ===
| |
| | |
| The document from the previous example is actually a good candidate for the ''Positional'' '''''Mapping Method'''''. This method does not rely on how columns are ''named'' but instead how they are ''ordered''. It presumes the first column in the delimiter-separated file is the '''Data Table's''' first child '''Data Column'''.
| |
| | |
| {|cellpadding=10 cellspacing=5
| |
| |valign=top style="width:40%"|
| |
| Such is the case for the CSV file we looked at earlier. The first '''Data Column''' corresponds to the first column in the CSV file, the second corresponds to the second, the third the third, and so on.
| |
| | |
| In this case, it doesn't matter what they're named, just how the '''Data Columns''' are positioned in '''Grooper''' (child order from top to bottom) and how the columns are positioned in the delimiter-separated file (column order from left to right). If this lines up, you can just marry the '''Data Columns''' with the document's columns, returning the first column's data to the first '''Data Column''' and so on.
| |
| |valign=top style="width:30%"|
| |
| [[File:Delimited-extract-20.png|center]]
| |
| |valign=top style="width:30%"|
| |
| [[File:Delimited-extract-21.png|center]]
| |
| |}
| |
| | |
| {|cellpadding=10 cellspacing=5
| |
| |valign=top style="width:40%"|
| |
| # Here, the '''''Mapping Method''''' property is set to ''Positional''.
| |
| # In this case, the full table extracts successfully.
| |
| #* Even though the '''Data Column''' names and the column labels in the document do not match, their ''positions'' do. The first child '''Data Column''' logically matches the data in the left-most column on the document, the next '''Data Column''' matches the next column on the document, and so on.
| |
| #* The ''Positional'' '''''Mapping Method''''' simply returns the first column on the document to the first '''Data Column''', the second the second, and so on.
| |
| | |
| {|cellpadding="10" cellspacing="5"
| |
| |-style="background-color:#36b0a7; color:white"
| |
| |style="font-size:14pt"|'''FYI'''
| |
| |
| |
| Notice this method doesn't need a row of column labels ''at all''. If your CSV or delimited TXT file does not have column labels, you can still use the ''Positional'' '''''Mapping Method''''' to collect the data.
| |
| |}
| |
| | |
| |
| |
| [[File:Delimited-extract-22.png|center]]
| |
| |
| |
| |-
| |
| |valign=top|
| |
| The (probably obvious) drawback to this method is the positions must match all the time for every document. If the columns are out of order, or there are extra columns in the document, this '''''Mapping Method'''' can start to break down.
| |
| | |
| # This document has an "ID" column as its first table column.
| |
| # Since this is now the first column, it maps directly to the first '''Data Column'''.
| |
| #* But that's not what we want! Now the column data is shifted. The first names are in the "Last Name" '''Data Column'''. The last names are in the "Email" '''Data Column''' and so on.
| |
| | |
| In this case, the last '''''Mapping Method''''' option, ''Mapped'' may be more suitable.
| |
| |
| |
| [[File:Delimited-extract-23.png|center]]
| |
| |}
| |
| | |
| === Mapped ===
| |
| | |
| The ''Mapped'' '''''Mapping Method''''' gives you the most control, dictating what '''Data Column''' matches which column in the delimited file. You can use a '''Lexicon''' or a '''''Local Entries''''' text editor and specific syntax to dictate this.
| |
| | |
| You will map the '''Data Column''' to the column label in the delimited file using the following format:
| |
| : <code><span style="color:red">{Data Column name}</span>=<span style="color:blue">{table column label name}</span></code>
| |
| {|cellpadding=10 cellspacing=5 style="margin:auto"
| |
| |style="text-align:center"|
| |
| For example, our mappings will look like this:
| |
| | |
| [[File:Delimited-extract-26.png]]
| |
| |style="text-align:center"|
| |
| '''Data Column''' names
| |
| | |
| [[File:Delimited-extract-24.png]]
| |
| |style="text-align:center"|
| |
| table column labels
| |
| | |
| [[File:Delimited-extract-25.png]]
| |
| |}
| |
| | |
| {|cellpadding="10" cellspacing="5"
| |
| |-style="background-color:#f89420; color:white"
| |
| |style="font-size:22pt"|'''⚠'''
| |
| |
| |
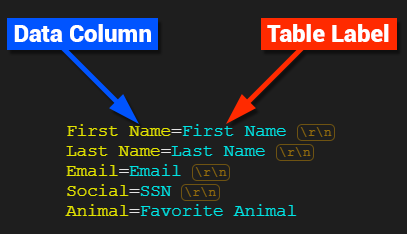
| Notice the '''Data Column''' named "First Name" was entered as <code>First_Name</code>.
| |
| <li><span style="color:white">Spaces and special characters in a '''Data Column's''' name ''must'' be replaced with an underscore (<code>_</code>).</li></span>
| |
| | |
| | |
| On the other hand, notice the column label "First Name" was entered ''with'' the space as <code>First Name</code>.
| |
| <li><span style="color:white">'''DO NOT''' replace spaces and special characters when entering the column label.</li></span>
| |
| <li><span style="color:white">What you enter for the column label must match the column label ''exactly''.</li></span>
| |
| |}
| |
| | |
| {|cellpadding=10 cellspacing=5
| |
| |valign=top style="width:40%"|
| |
| To enter these mappings, do the following.
| |
| | |
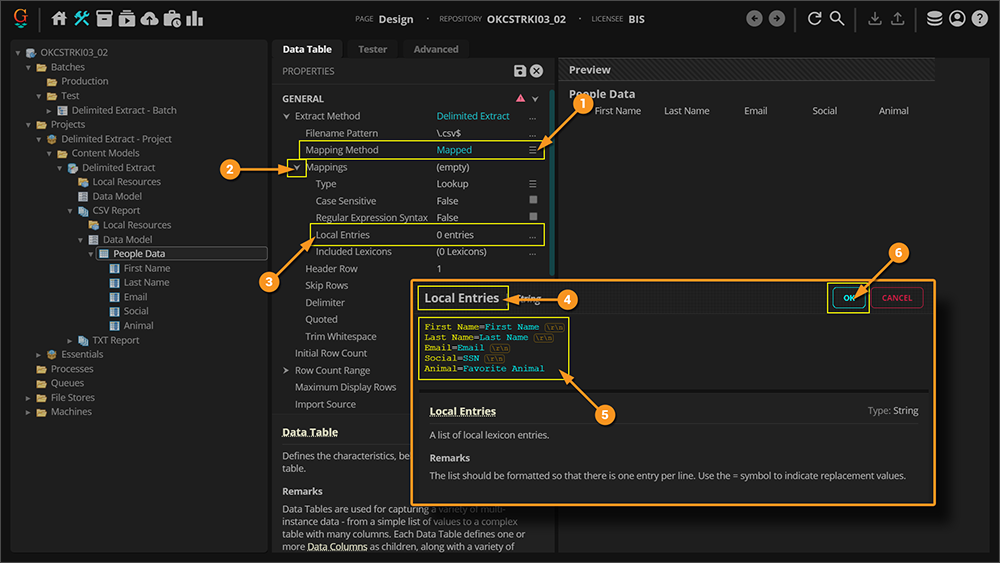
| # Change the '''''Mapping Method''''' property to ''Mapped''.
| |
| # Expand the '''''Mappings''''' sub-properties.
| |
| # To add a local list of mappings, select the '''''Local Entries''''' property and press the ellipsis button at the end.
| |
| # This will bring up a list editor window.
| |
| # Using the syntax described above, enter a list of '''Data Column''' to table column label mappings.
| |
| # Press the "OK" button when finished.
| |
| | |
| {|cellpadding="10" cellspacing="5"
| |
| |-style="background-color:#36b0a7; color:white"
| |
| |style="font-size:14pt"|'''FYI'''
| |
| |
| |
| You can also use the '''''Included Lexicons''''' property to point to a '''Lexicon''' object in the Node Tree instead of using a local list.
| |
| | |
| You will use the exact same syntax as described above in both cases.
| |
| |}
| |
| |
| |
| [[File:Delimited-extract-27.png]]
| |
| |-
| |
| |valign=top|
| |
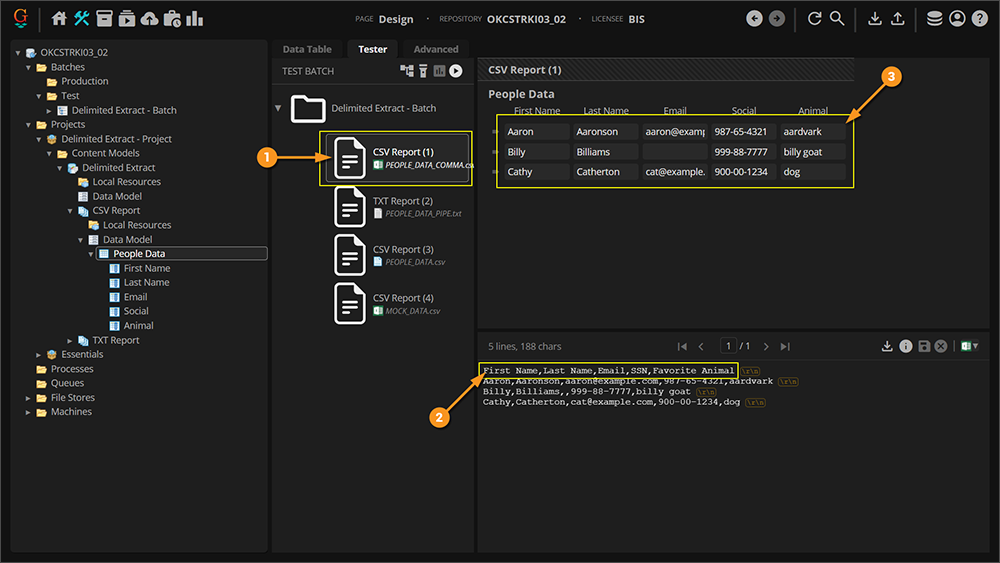
| Now, with these mappings listed out using the ''Mapped'' '''''Mapping Method'''''. ''Delimited Extract'' will successfully extract the data for ''both'' CSV files sharing the same column labels, but have those columns in different positional order.
| |
| | |
| # For this document...
| |
| # ...the listed mappings match up the columns labeled here...
| |
| # ...with their corresponding '''Data Columns''', and the table's data is returned.
| |
| |
| |
| [[File:Delimited-extract-28.png]]
| |
| |-
| |
| |valign=top|
| |
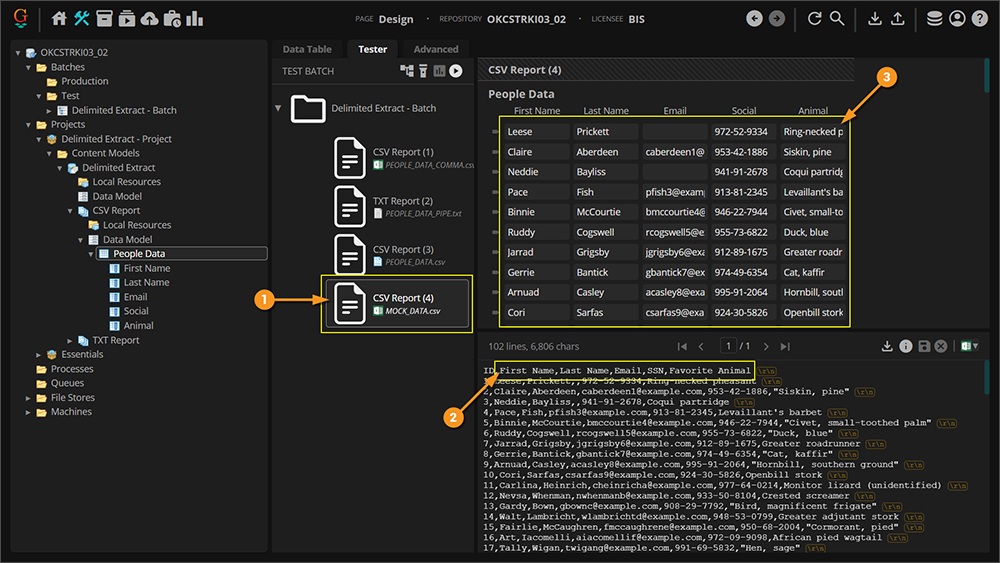
| # This document extracts correctly as well!
| |
| # Even though these column labels have different positions (due to there being an additional "ID" column).
| |
| # The ''Mapped'' method ignores the unlisted "ID" column's data and the table is returned, mapping the listed columns with the listed '''Data Columns'''.
| |
| |
| |
| [[File:Delimited-extract-29.png]]
| |
| |}
| |
| | |
| </tab>
| |
| <tab name="Filename Pattern and Delimiter Considerations" style="margin:20px">
| |
| === Filename Pattern and Delimiter ===
| |
| Prior to '''Grooper 2021''', the ''Delimited Extract'' method was called ''CSV Extract''. Given the name ''CVS Extract'', it not surprisingly only extracted tabular data from CSV files. In version '''2021''', this functionality was expanded to include functionality for delimited TXT files as well as delimiter characters other than commas.
| |
| {|cellpadding=10 cellspacing=5
| |
| |valign=top style="width:40%"|
| |
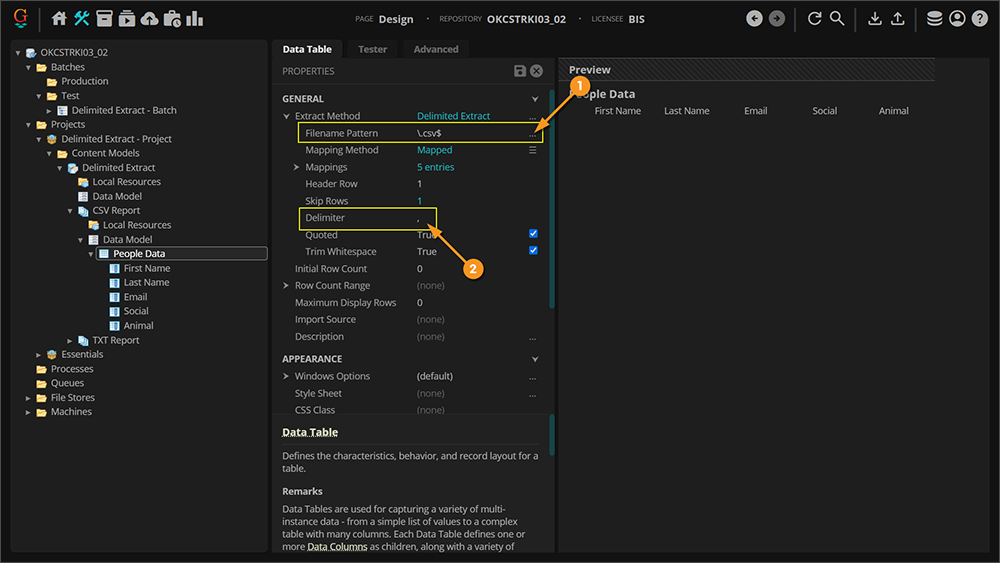
| For example, in our example '''Batch''' we have a TXT file that uses a pipe delimiter (<code>|</code>). To get this delimited file's table to extract correctly, we will need to configure ''two'' additional properties.
| |
| # The '''''Filename Pattern''''' property
| |
| #* This will allow us to dictate what file format (or formats) are present and should be extracted.
| |
| # The '''''Delimiter''''' property
| |
| #* This will allow us to dictate what delimiter character is used in the delimiter-separated file (a comma, a pipe, a semicolon, etc).
| |
| |
| |
| [[File:Delimited-extract-30.png]]
| |
| |-
| |
| |valign=top|
| |
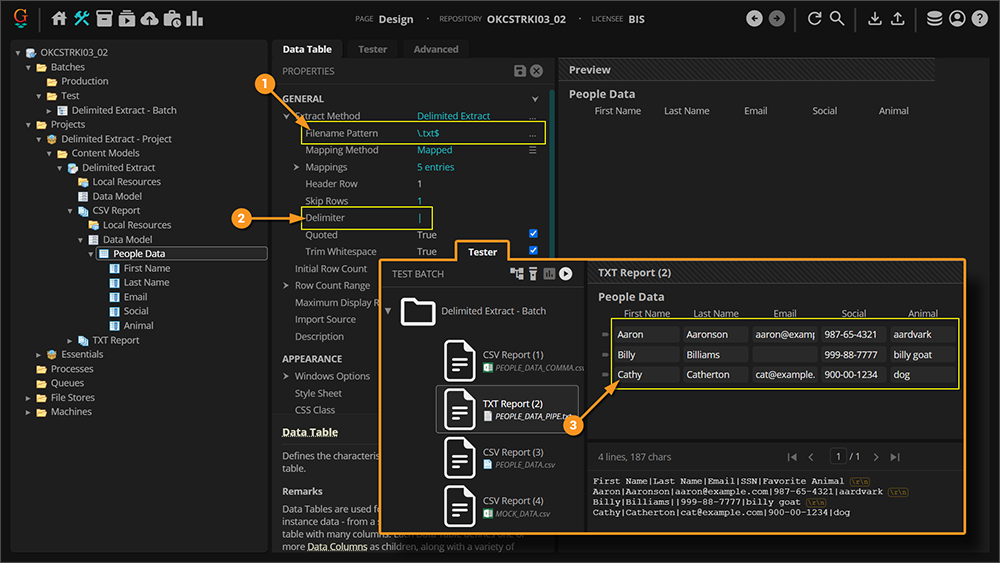
| # The '''''Filename Pattern''''' is a regular expression pattern that runs against the attached file's name. If the pattern returns a match, ''Delimited Extract'' executes and attempts to return data. If it doesn't match, no extraction is even attempted.
| |
| #* The default pattern is <code>\.csv$</code>. This will match any filename ending in ".csv", or in other words, any CSV file.
| |
| #* If we want ''Delimited Extract'' to return tablular data from delimited TXT files, we will need a ''different'' pattern.
| |
| #** The pattern <code>\.txt$</code> would match any filename ending in ".txt". In other words, any TXT file.
| |
| #** FYI: What if have a mix of TXT and CSV files? The pattern <code>(\.csv|\.txt)$</code> would match any filename ending in ".csv" or ".txt".
| |
| # The '''''Delimiter''''' property indicates what delimiter character the ''Delimited Extract'' method expects to find between column values.
| |
| #* The default character is a comma (<code>,</code>) because CSV files are "comma-separated".
| |
| #* If we want ''Delimited Extract'' to return data from a "pipe-delimited" file, we just need to enter a pipe character here (<code>|</code>).
| |
| # With these two properties adjusted, the pipe-delimited TXT file can be returned.
| |
| |
| |
| [[File:Delimited-extract-31.png]]
| |
| |}
| |
| | |
| {|cellpadding="10" cellspacing="5"
| |
| |-style="background-color:#f89420; color:white"
| |
| |style="font-size:22pt"|'''⚠'''
| |
| |
| |
| ONLY one delimiter may be used. If you have a mix of delimiter characters, you will likely need to take advantage of '''Grooper's''' hierarchical data modeling capabilities.
| |
| | |
| Such is actually the case here. We have two '''Document Types''' in this '''Content Model''': "CSV Report" and "TXT Report". Each have their own '''Data Models''' with their own child '''Data Tables''' named "People Data". The "CSV Report" '''Document Type's''' '''Data Table''' uses the ''Delimited Extract'' method configured to return data from comma-delimited CSV files, while the "TXT Report" '''Document Type's''' '''Data Table''' uses the ''Delimited Extract'' method to return data from pipe-delimited TXT files.
| |
| | |
| (Alternatively, we could have created a single parent '''Data Model''' and taken advantage of a '''Document Type's''' '''''Data Element Override''''' properties. Both approaches accomplish the same task. The point is we would need to classify the different types of files as different '''Document Types''' and used different configurations of ''Delimited Extract'', one applicable to CSV files and one to pipe-delimited TXT files.)
| |
| |}
| |
| </tab>
| |
| </tabs>
| |
|
⚠
|
This article was migrated from an older version and has not been updated for the current version of Grooper.
This tag will be removed upon article review and update.
|
|
This article is about the current version of Grooper.
Note that some content may still need to be updated.
|
| 2025 |
2023 | 2021 |
Delimited Extract is a Table Extract Method that extracts tabular data from a delimiter-separated text file, such as a CSV file.
This is the fastest, simplest and most effective method of extracting data from character delimited files, such as comma delimited CSV files or TXT files delimited by commas or other characters.
About
|

|
You may download and import the file(s) below into your own Grooper environment (version 2023). There is a Batch with the example document(s) discussed in this tutorial, as well as a Project configured according to its instructions.
Please upload the Project to your Grooper environment before uploading the Batch. This will allow the documents within the Batch to maintain their classification status.
|
A delimited text file is, effectively, a table of information saved to a simple text format. Rows in the table are easy to represent in a text file. Each row is a new line in the file. Columns are little trickier. They are marked by a "delimiter" character. This character is used to define where the table columns are in the text file.
For example, CSV (comma-separated values) files use a comma (,) as a delimiter. When opened in a spreadsheet program, such as Microsoft Excel or Google Sheets, these files look like standard spreadsheets. So, a CSV file with a table with some generic information collected for individuals might look something like the table below.
| First Name |
Last Name |
Email |
SSN |
Favorite Animal
|
| Aaron |
Aaronson |
aaron@example.com |
987-65-4321 |
aardvark
|
| Billy |
Billiams |
|
999-88-7777 |
billy goat
|
| Cathy |
Catherton |
cat@example.com |
900-00-1234 |
dog
|
But a delimited file is just text data. There are no lines dividing the rows and columns. Instead, the vertical line boundaries between each column would be replaced with the delimiter character (a , for CSV files) and each row would be a new line in the file. So, it would look like the text below.
First Name,Last Name,Email,SSN,Favorite Animal
Aaron,Aaronson,aaron@example.com,987-65-4321,aardvark
Billy,Billiams,,999-88-7777,billy goat
Cathy,Catherton,cat@example.com,900-00-1234,dog
TXT files can also be formatted as delimiter-separated tables. They may use a comma (,) or a different separator such as a semicolon (;) or a "pipe" character (|). For example, a "pipe-delimited" TXT file version of the data above would look like the text below.
First Name|Last Name|Email|SSN|Favorite Animal
Aaron|Aaronson|aaron@example.com|987-65-4321|aardvark
Billy|Billiams||999-88-7777|billy goat
Cathy,Catherton|cat@example.com|900-00-1234|dog
The only difference is one file is a CSV file, using a comma (,) to distinguish the columns and the other is a TXT file, using the pipe character (|).
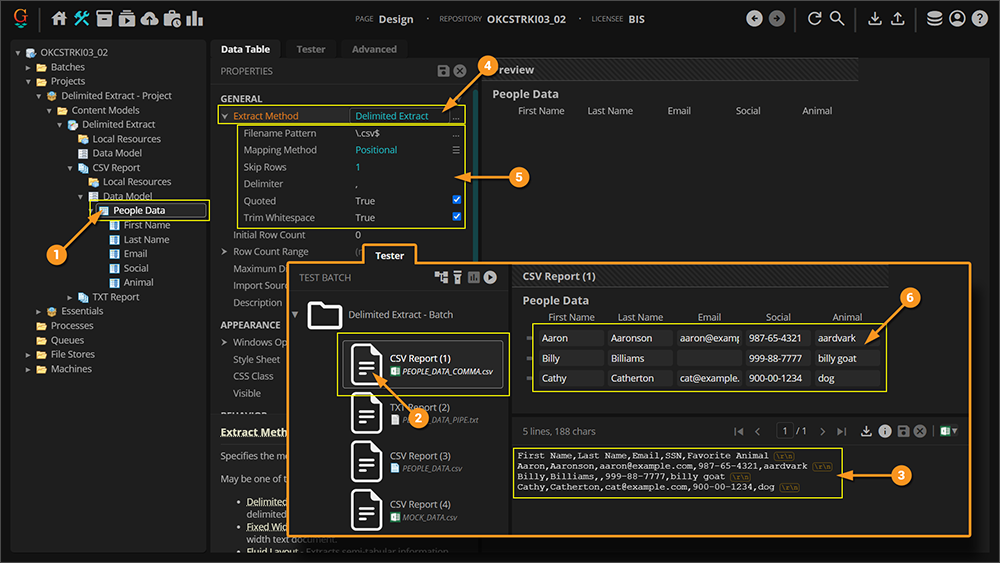
The Delimited Extract table extraction method will parse these kinds of files and return their data to a Data Table object in a Data Model.
- For example, here we have a Data Table named "People Data" configured to extract tabular data from a CSV file.
- You can see the attached file to this Batch Folder is a CSV file named "PEOPLE_DATA_COMMA.csv".
- In the Document Viewer, we can see this is a simple CSV file with the data described above.
- Each column ("First Name", "Last Name", "Email", "SSN", and "Favorite Animal") is separated by a single
, character.
- The Data Table's Extract Method property is set to Delimited Extract.
- The Delimited Extract sub-properties are configured according to the extracted file's type and delimited format.
- These properties dictate what the imported document's filetype is (i.e. CSV or TXT), what delimiter character is used, how the data is mapped to the Data Table object's Data Columns.
- These settings will be discussed in more depth, in the How To section of this article.
- Upon extraction, the Data Table returns the CSV file's data.
|
⚠
|
Currently, Grooper does not support "tabs" as a delimiter character. At the time of writing this article, the 'Delimited Extract method cannot extract data from a tab-delimited TXT file. Alternate Extract Methods, such as the Row Match method, must be used instead.
|
How To
Prereqs
There are three critical perquisites in order for the Delimited Extract method to work properly, whether testing its configuration in Design or collecting the data during the Extract activity of a Batch Process.
- The Batch Folder must have an attached character-delimited file of a CSV or TXT format.
- Excel files (XLSX) are capable of utilizing the Delimited Extract method. However, they must be converted to a CSV format first.
- For more information on converting Excel files to CSV files, visit the Microsoft Office Integration article.
- If imported sparsely, the Batch Folder's attached CSV or TXT file must be loaded prior to extraction.
- The Batch Folder must be classified.
1. Attached File Considerations
THE BATCH FOLDER MUST HAVE AN ATTACHED FILE OF A CSV OR TXT FORMAT
When you import digital files into Grooper (ie PDFs, Word documents, Excel spreadsheets, TXT files, etc), they are stored as attachments on the created Batch Folder in the Batch. When inspecting a Batch, the attached files are listed at the bottom of the Batch Folder icon.
- The documents here have CSV and a character-delimited TXT file attached to the Batch Folders. These documents are suitable for Delimited Extract.
- Microsoft Excel files can also take advantage of Delimited Extract. However, they must first be converted to the CSV file format.
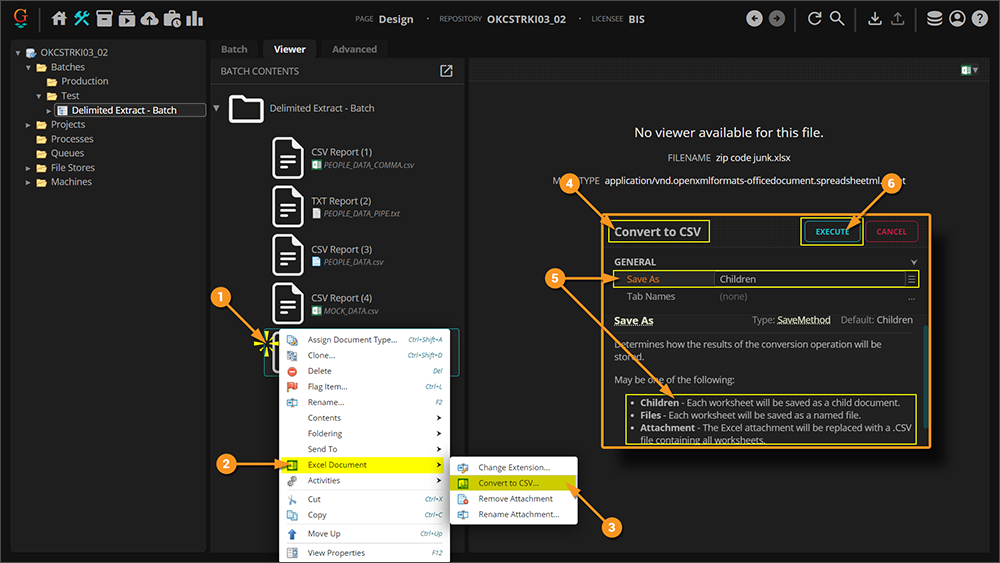
- Excel files (XLSX) are not natively readable by Grooper. Without converting them to a CSV file (which is natively readable), you will see this message in the document viewer.

From Design , you can convert a single XLSX file quickly and easily if you're trying to test out your Data Table's Delimited Extract configuration. You can perform the following steps from the Batch Viewer at any node in the Node Tree. If you can get to a Batch Viewer, and select a batch using the node's UI, you can do the following to convert an Excel file to CSV.
- Right-click the document folder with the attached Excel file.
- Select "Excel Document".
- Select "Convert to CSV..."
- This will bring up the following "Convert to CSV" configuration window.
- Using the Save As property choose how you want to convert the file.
- Children - Each worksheet will be saved as a child document.
- Files - Each worksheet wil be saved as a named file.
- Attachment - The Excel attachment will be replaced with a .csv file containing all worksheets.
- Press the "Execute" button to convert the Excel file to a CSV file.
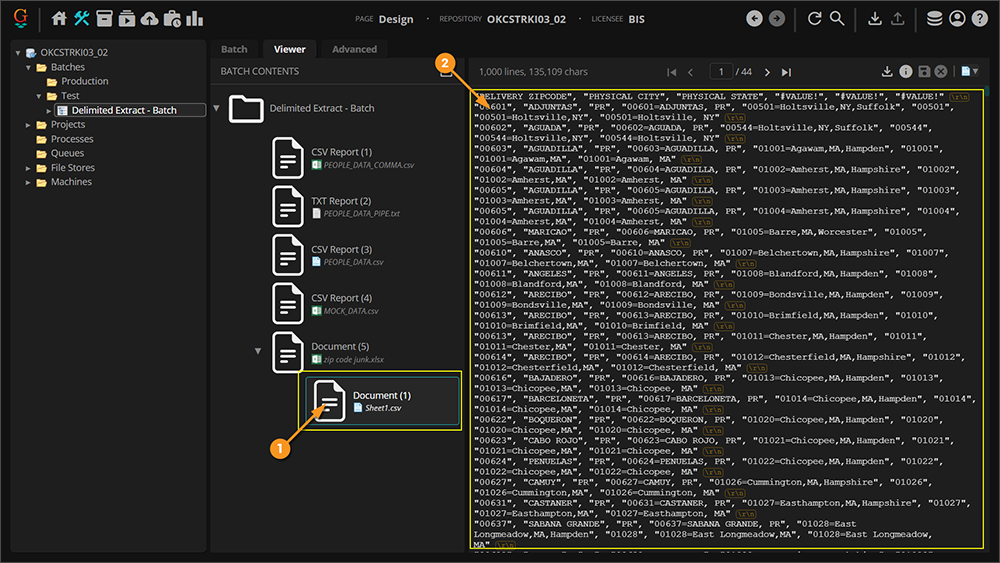
- Since we chose the Children option, the attached file is created as .csv child object to the parent .xlsx document.
- CSV files are natively readable by Grooper. Now we can view the file in the Document Viewer and Grooper can process the document.
|
FYI
|
This is a very "ad hoc" method of converting Excel files to CSV files. You can also perform this conversion using the Execute activity, selecting Excel Document as the Object Type and choosing Excel to CSV as the Command. You will use the Execute activity to automate converting Excel files in a Batch Process. For more information, visit the Microsoft Office Integration article.
|
2. Load the File
IF IMPORTED SPARSELY, THE BATCH FOLDER'S ATTACHED CSV OR TXT FILE MUST BE LOADED PRIOR TO EXTRACTION.
Digital files are imported into Grooper either "sparsely" or "fully".
- Fully imported files are fully loaded into the Grooper Repository. Their metadata properties (file name and extension, file dimensions, MIME type information, etc) are stored in the Grooper Database and their content (the full file itself) is copied to the Grooper File Store.
- Sparsely imported files are only partially loaded. Their metadata properties are stored in the Grooper Database, but their content is not copied to the Grooper File Store. Instead the content is accessed with a link to the file's location (for example, if you import a file from your Windows hard drive, it would be its Windows folder location).
Typically, a sparsely imported document is described as a "usable" document in Grooper. You can classify it. You can extract data from it. You can apply Activities to it and it will behave as if it were fully loaded. Just instead of using a local copy in the Grooper File Store to process the document, Grooper travels the document link to access the file.
However, this is not the case for Delimited Extract. The attached file must be loaded (copied into the Grooper File Store) in order to extract any data.
- A sparsely imported file will be indicated by a gold chain link on the Batch Folder icon.
- If you attempt to extract the data using Delimited Extract, nothing will return at this point.
From Design , you can load file quickly and easily if you're trying to test out your Data Table's Delimited Extract configuration. You can perform the following steps from the Batch Viewer at any node in the Node Tree. If you can get to a Batch Viewer, and select a batch using the node's UI, you can do the following to load a Batch Folder's attached file (be it a CSV file, a TXT file, an XLSX file, a PDF file, or any other file).
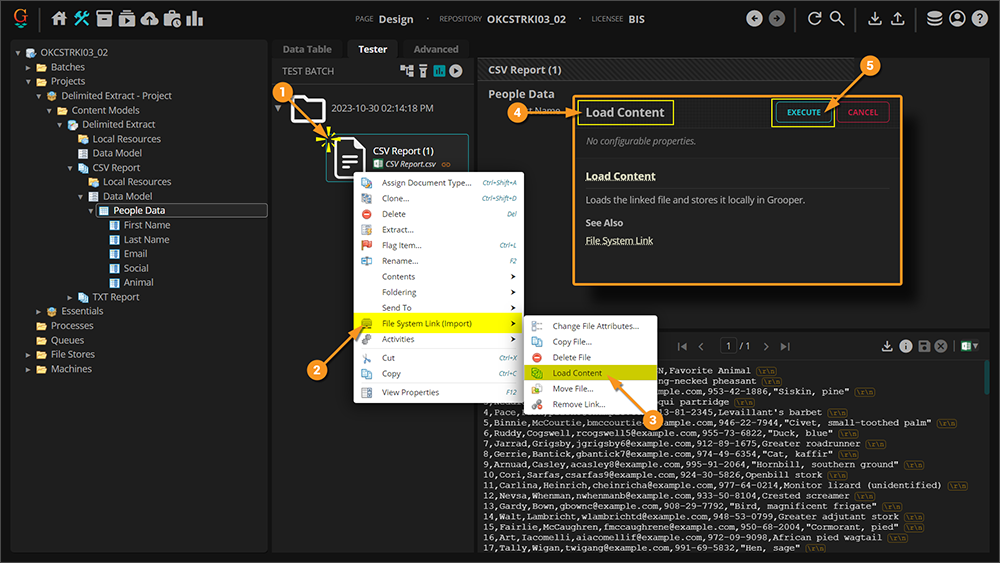
- Right-click the document folder with the attached file.
- Select "File System Link".
- Select "Load Content..."
- This will bring up the following "Load Content" configuration window.
- Press the "Execute" button to load the file into the Grooper File Store.
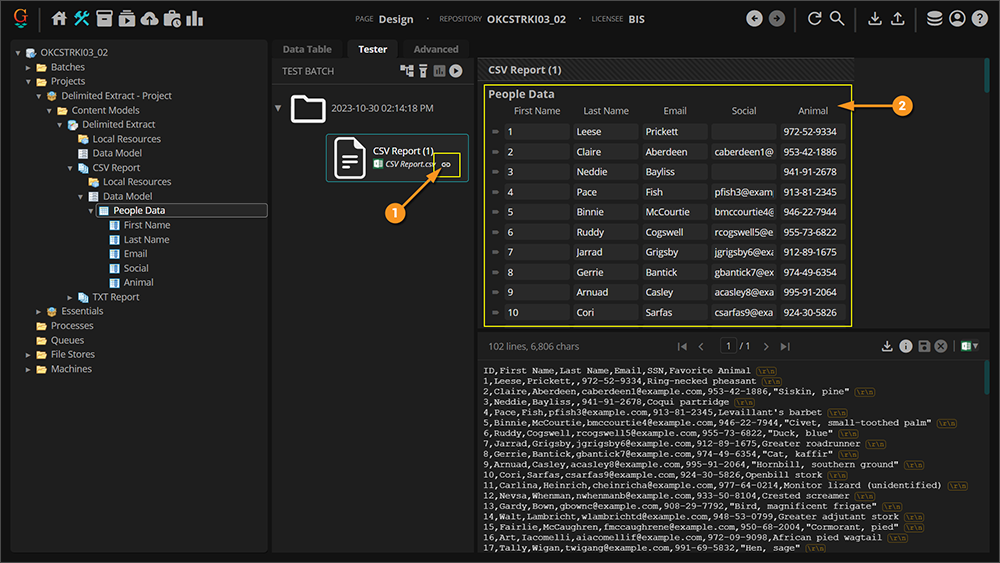
- Upon loading the content, the chain link will change color from grey to silver.
- The silver link indicates the content is loaded but Grooper retains a link to the file's location. This link can be used in the future if the content needs to be reloaded or otherwise accessed from its external location. Alternatively the link can be removed if no longer needed once the content is fully loaded into Grooper.
- With the content loaded, the data can now be extracted using Delimited Extract.
|
FYI
|
This too is a very "ad hoc" method of loading files. You do the same thing using the Execute activity, selecting File System Link as the Object Type (or CMIS Document Link, FTP Link, Mail Link or one of the other Link options depending how the file was imported from what external storage platform) and choosing Load Content as the Command. You will use the Execute activity to automate loading files in a Batch Process.
|
3. Classify the Document Folder
THE BATCH FOLDER MUST BE CLASSIFIED.
When building a Batch Process you will always add an Extract activity after a Classify activity or some other operation classifies the Batch Folders in a Batch. This is because the Extract activity looks for the Content Type assigned to the document folder to access the Data Model configured to collect data from the document.
Typically, document folders do not need to be classified when performing unit testing in Design. You can navigate to a Data Model or its child Data Elements in the Node Tree, select an unclassified Batch Folder object in a Batch, press the "Test Extraction" button and a preview of the extracted data will be presented in the UI.
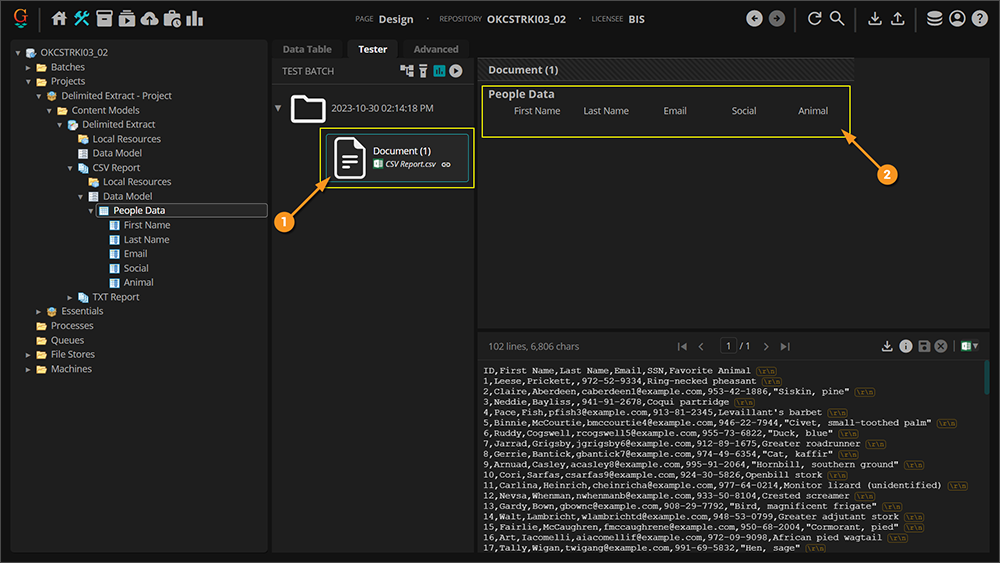
This is not the case when testing the Delimited Extract method! The Batch Folder must be classified (assigned a Document Type) in order to test extraction.
- These documents are not classified. They do not have a Document Type assigned to them. They are generically listed as "Document".
- Upon testing the Data Table (using the Delimited Extract method), no data returns.
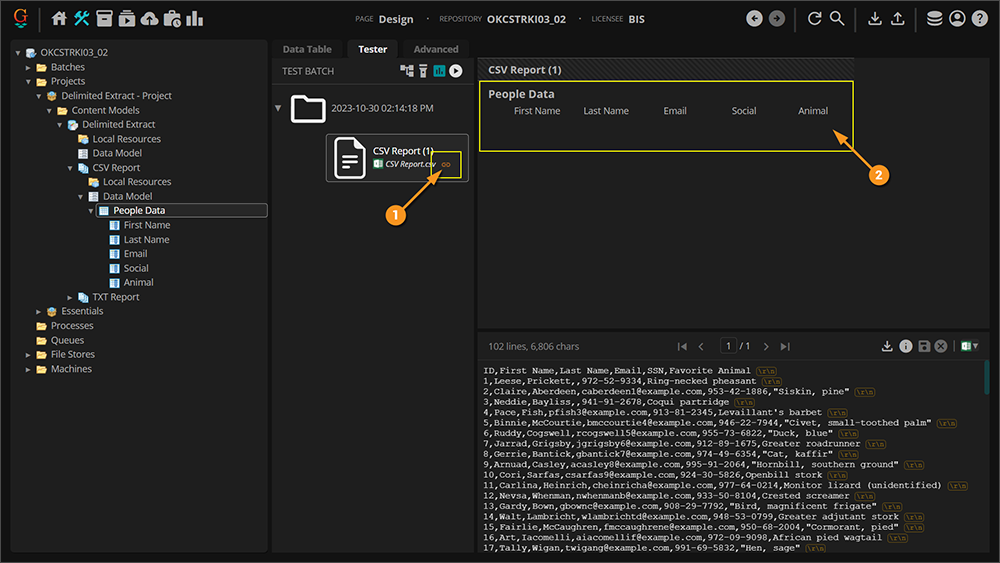
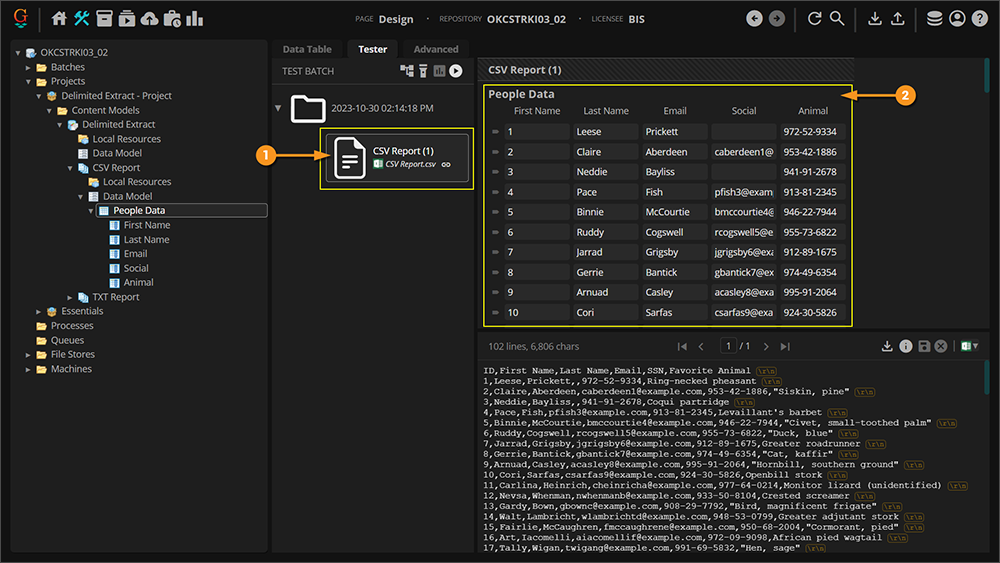
- These documents are classified. They have either the "CSV Report" or "TXT Report" Document Type (added to this Content Model) assigned to them.
- As a classified document, upon testing the Data Table (using the Delimited Extract method), the table data is returned.
To use Delimited Extract you will choose this as the Extract Method property of a Data Table
- Add or select a Data Table in the Node Tree.
- We've selected the Data Table named "People Data". It is a Data Element of the "CSV Report" Document Type's Data Model.
- Select the Extract Method property.
- Choose Delimited Extract from the list of table extraction methods.
Choose the Mapping Method
With Delimited Extract enabled, arguably the most important consideration is how you configure the Mapping Method property. This property determines how the "columns" in the delimiter-separated file correspond to the Data Columns in your Data Table. This can be one of three options:
- Named
- Positional
- Mapped
Named
The Named option will use column headers in the delimiter-separated file to map columns to the Data Columns in our Data Table. As long as the names match, Grooper will populate the Data Column with the data in the correspondingly named column in the CSV or TXT file.
For example, the Data Table in our example has five Data Columns.
- First Name
- Last Name
- Email
- Social
- Animal
The CSV files in our batch also have five columns.

However, some of the names are the same and some are different.
Only the "First Name", "Last Name" and "Email" columns match.
The "Social" and "Animal" Data Columns are labeled "SSN" and "Favorite Animal" in the CSV file.

If we were to test extraction of this CSV file using the Named method, only part of the delimiter-separated values will be collected. Those in the columns whose names match will be returned, but the columns whose names do not will not.
- The default Mapping Method option is Named
- Upon extraction, Grooper will search the first row of the file for the column header labels.
- The column headers must be present on the first row in order for this method to work.
- If a column header matches the name of one of the Data Table's child Data Columns, that Data Column will return that column's data in the delimiter-separated file.
- In our case, the names for the "First Name", "Last Name", and "Email" columns match. So that data is returned to the correspondingly named Data Column.
- This is also order independent. If "Email" was the first Data Column instead of the third, it would still return the data from the "Email" column on the document because their names still match.
- The "Social" and "Animal" Data Columns are blank because their names do not match.
If we changed the name of our Data Columns to match (both be named "SSN" and "Favorite Animal" respectively), we would get the full table populated.
However, let's completely ignore that and look at the next Mapping Method option, Positional.
|
FYI
|
|
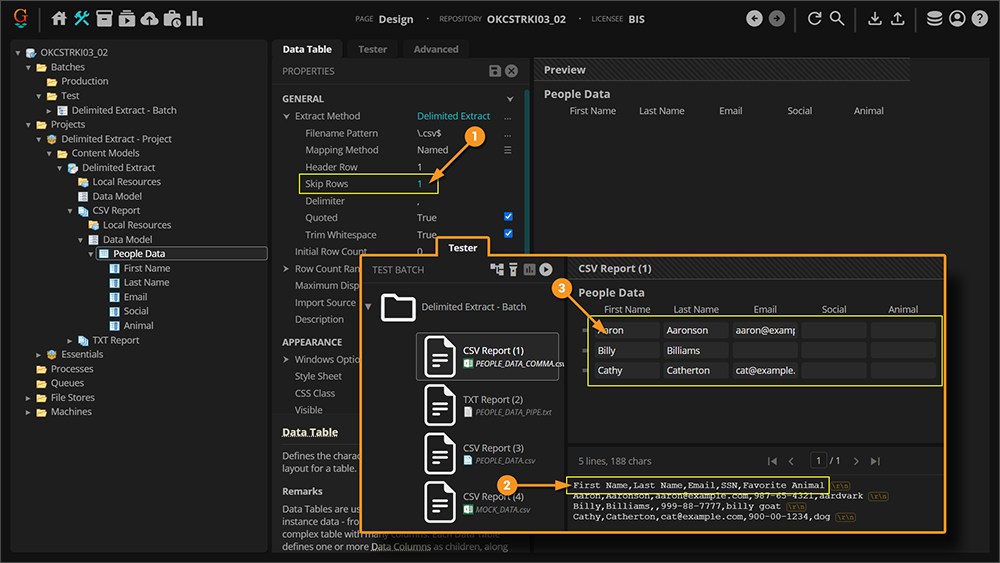
Before we do that, you probably noticed the first line of the table (the one with the column headers) is returned along with the actual table data. This is probably "junk data" you don't ultimately want collected at time of extraction.
- This is what the Skip Rows property is for.
- Set this to 1 and it will skip the first row in the file.
- This will remove that header row from our extracted results, extracting only the second and beyond.
|
|
|
Positional
The document from the previous example is actually a good candidate for the Positional Mapping Method. This method does not rely on how columns are named but instead how they are ordered. It presumes the first column in the delimiter-separated file is the Data Table's first child Data Column.
Such is the case for the CSV file we looked at earlier. The first Data Column corresponds to the first column in the CSV file, the second corresponds to the second, the third the third, and so on.
In this case, it doesn't matter what they're named, just how the Data Columns are positioned in Grooper (child order from top to bottom) and how the columns are positioned in the delimiter-separated file (column order from left to right). If this lines up, you can just marry the Data Columns with the document's columns, returning the first column's data to the first Data Column and so on.
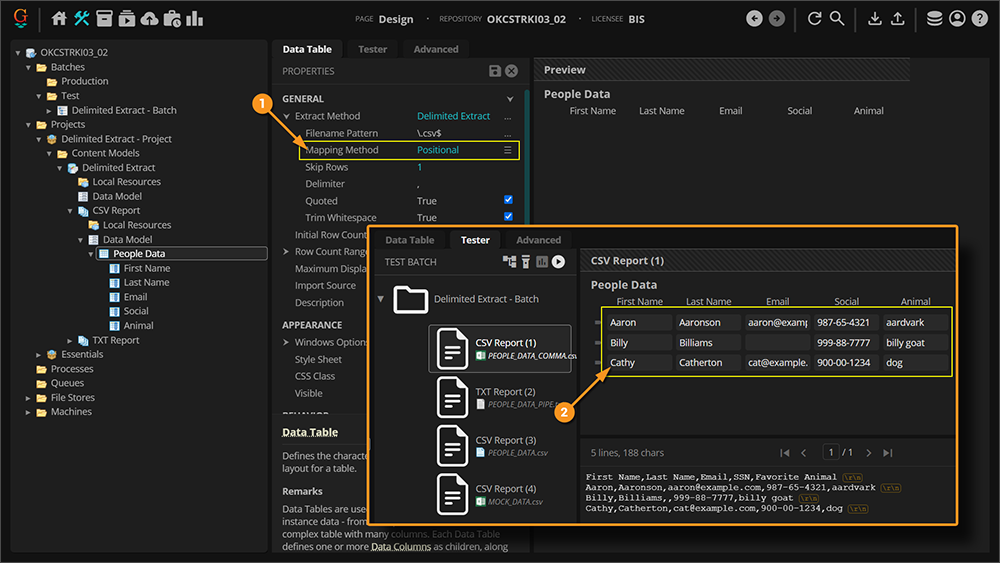
- Here, the Mapping Method property is set to Positional.
- In this case, the full table extracts successfully.
- Even though the Data Column names and the column labels in the document do not match, their positions do. The first child Data Column logically matches the data in the left-most column on the document, the next Data Column matches the next column on the document, and so on.
- The Positional Mapping Method simply returns the first column on the document to the first Data Column, the second the second, and so on.
|
FYI
|
Notice this method doesn't need a row of column labels at all. If your CSV or delimited TXT file does not have column labels, you can still use the Positional Mapping Method to collect the data.
|
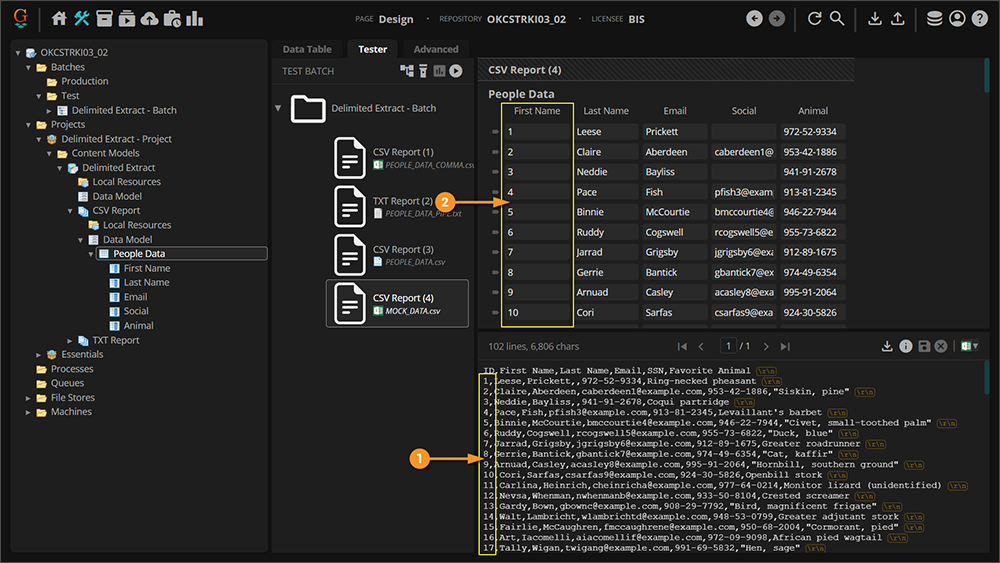
The (probably obvious) drawback to this method is the positions must match all the time for every document. If the columns are out of order, or there are extra columns in the document, this Mapping Method' can start to break down.
- This document has an "ID" column as its first table column.
- Since this is now the first column, it maps directly to the first Data Column.
- But that's not what we want! Now the column data is shifted. The first names are in the "Last Name" Data Column. The last names are in the "Email" Data Column and so on.
In this case, the last Mapping Method option, Mapped may be more suitable.
Mapped
The Mapped Mapping Method gives you the most control, dictating what Data Column matches which column in the delimited file. You can use a Lexicon or a Local Entries text editor and specific syntax to dictate this.
You will map the Data Column to the column label in the delimited file using the following format:
{Data Column name}={table column label name}
|
For example, our mappings will look like this:
|
Data Column names
|
table column labels

|
To enter these mappings, do the following.
- Change the Mapping Method property to Mapped.
- Expand the Mappings sub-properties.
- To add a local list of mappings, select the Local Entries property and press the ellipsis button at the end.
- This will bring up a list editor window.
- Using the syntax described above, enter a list of Data Column to table column label mappings.
- Press the "OK" button when finished.
|
FYI
|
You can also use the Included Lexicons property to point to a Lexicon object in the Node Tree instead of using a local list.
You will use the exact same syntax as described above in both cases.
|
Now, with these mappings listed out using the Mapped Mapping Method. Delimited Extract will successfully extract the data for both CSV files sharing the same column labels, but have those columns in different positional order.
- For this document...
- ...the listed mappings match up the columns labeled here...
- ...with their corresponding Data Columns, and the table's data is returned.
- This document extracts correctly as well!
- Even though these column labels have different positions (due to there being an additional "ID" column).
- The Mapped method ignores the unlisted "ID" column's data and the table is returned, mapping the listed columns with the listed Data Columns.
Filename Pattern and Delimiter
Prior to Grooper 2021, the Delimited Extract method was called CSV Extract. Given the name CVS Extract, it not surprisingly only extracted tabular data from CSV files. In version 2021, this functionality was expanded to include functionality for delimited TXT files as well as delimiter characters other than commas.
For example, in our example Batch we have a TXT file that uses a pipe delimiter (|). To get this delimited file's table to extract correctly, we will need to configure two additional properties.
- The Filename Pattern property
- This will allow us to dictate what file format (or formats) are present and should be extracted.
- The Delimiter property
- This will allow us to dictate what delimiter character is used in the delimiter-separated file (a comma, a pipe, a semicolon, etc).
- The Filename Pattern is a regular expression pattern that runs against the attached file's name. If the pattern returns a match, Delimited Extract executes and attempts to return data. If it doesn't match, no extraction is even attempted.
- The default pattern is
\.csv$. This will match any filename ending in ".csv", or in other words, any CSV file.
- If we want Delimited Extract to return tabular data from delimited TXT files, we will need a different pattern.
- The pattern
\.txt$ would match any filename ending in ".txt". In other words, any TXT file.
- FYI: What if have a mix of TXT and CSV files? The pattern
(\.csv|\.txt)$ would match any filename ending in ".csv" or ".txt".
- The Delimiter property indicates what delimiter character the Delimited Extract method expects to find between column values.
- The default character is a comma (
,) because CSV files are "comma-separated".
- If we want Delimited Extract to return data from a "pipe-delimited" file, we just need to enter a pipe character here (
|).
- With these two properties adjusted, the pipe-delimited TXT file can be returned.
|
⚠
|
ONLY one delimiter may be used. If you have a mix of delimiter characters, you will likely need to take advantage of Grooper's hierarchical data modeling capabilities.
Such is actually the case here. We have two Document Types in this Content Model: "CSV Report" and "TXT Report". Each have their own Data Models with their own child Data Tables named "People Data". The "CSV Report" Document Type's Data Table uses the Delimited Extract method configured to return data from comma-delimited CSV files, while the "TXT Report" Document Type's Data Table uses the Delimited Extract method to return data from pipe-delimited TXT files.
(Alternatively, we could have created a single parent Data Model and taken advantage of a Document Type's Data Element Override properties. Both approaches accomplish the same task. The point is we would need to classify the different types of files as different Document Types and used different configurations of Delimited Extract, one applicable to CSV files and one to pipe-delimited TXT files.)
|


